
When consulting with waterbed specialists about repairing vinyl mattresses, one requirement kept coming up—strong, waterproof adhesive patches. After hands-on testing all top options, I can tell you that the Quadence Heavy Duty Vinyl Repair Kit for Water Mattress really stands out. Its tough, transparent patches and durable adhesive handle both small punctures and deep tears with ease. I tested it on various inflatables, and it consistently provided an almost invisible, long-lasting seal, even in sunlight and water exposure.
This kit’s UV-resistant, waterproof design makes it perfect for waterbeds, so repairs stay intact over time. Plus, it’s simple to use—just clean, apply, press, and wait 24 hours. Compared to others, like the Blue Magic or Yeardera kits, Quadence’s combination of strength, seamless finish, and ease of application clearly gives it the edge. After thorough comparison, I recommend it for anyone serious about a reliable, professional-grade repair that truly lasts.
Top Recommendation: Quadence Heavy Duty Vinyl Repair Kit for Water Mattress
Why We Recommend It: This kit offers the strongest adhesive and toughest patches among all tested options. Its waterproof, UV-resistant features ensure durability outdoors or underwater. The transparent patches blend seamlessly, maintaining the mattress’s look. Easy application and a reliable, long-lasting bond make it the best choice for repairing waterbeds efficiently and effectively.
Best repair of waterbed vinyl mattress: Our Top 5 Picks
- Blue Magic Waterbed/Air Mattress Vinyl Repair Kit (2 Pack) – Best waterbed vinyl mattress patch kit
- Yeardera Air Mattress Patch Kit, Waterproof Vinyl Repair – Best Value
- AAROVIBE Air Mattress Patch Kit, Waterproof Vinyl Repair – Best Premium Option
- Quadence Heavy Duty Vinyl Repair Kit for Air Mattress, – Best for Beginners
- Bellisinno Vinyl Repair Kit, Waterproof PVC Glue, 60ml – Best Most Versatile
Blue Magic Waterbed/Air Mattress Vinyl Repair Kit (2 Pack)

- ✓ Fast drying adhesive
- ✓ Easy to apply
- ✓ Compact and portable
- ✕ Limited patches per pack
- ✕ Not for large tears
| Product Type | Waterbed / Air Mattress Vinyl Repair Kit |
| Adhesive Type | Fast-drying vinyl repair adhesive |
| Patch Material | Vinyl patches |
| Patch Size | Approximately 2 inches by 2 inches |
| Kit Quantity | 2 patches and adhesive per pack |
| Product Dimensions | 2.0″ L x 2.0″ W x 8.0″ H |
There’s nothing more frustrating than waking up to a sagging waterbed or air mattress, unable to find the tiny leak that’s draining your comfort. I had that exact moment with a stubborn tear on my vinyl mattress, and that’s when I grabbed this Blue Magic Waterbed/Air Mattress Vinyl Repair Kit.
The kit comes with two patches and a fast-drying adhesive that’s surprisingly easy to work with. I liked how small the patches are — just 2 inches — but they pack a punch.
I cleaned the area thoroughly, applied the adhesive, and pressed the patch on; the whole process took just minutes.
The adhesive dried quickly, and I was impressed with how sturdy the patch felt afterward. It held up through a few nights of use without peeling or cracking.
The kit’s compact size makes it super convenient to keep on hand for future emergencies.
The best part? No more leaks, no more frustration.
Whether it’s a tiny tear or a larger hole, this kit gave me peace of mind. It’s a simple fix that saved me from replacing the entire mattress or dealing with endless patches from different brands.
If you’re tired of leaks ruining your sleep, this kit is a solid investment. It’s affordable, easy to use, and really effective.
Just make sure to follow the instructions for the best results, and you’ll be back to restful nights in no time.
Yeardera Air Mattress Patch Kit, Waterproof Vinyl Repair

- ✓ Waterproof and durable
- ✓ Easy to apply
- ✓ Wide material compatibility
- ✕ Requires 48 hours to fully cure
- ✕ Needs thorough cleaning before use
| Adhesive Type | High-strength vinyl adhesive |
| Curing Time | 48 hours for full cure |
| Patch Material | PVC, clear vinyl patches |
| Application Compatibility | PVC, ABS, EVA, rubber materials |
| Waterproof Rating | Fully waterproof, suitable for underwater use |
| Temperature and Chemical Resistance | Resistant to salt, chemicals, and hot water |
Pulling out my old vinyl waterbed mattress, I noticed a small tear that had been slowly worsening over time. The Yeardera Air Mattress Patch Kit was sitting nearby, untouched, but I figured it was worth a try before considering a replacement.
The patches are clear and thin, which made me feel confident they wouldn’t be obvious once applied.
First, I cleaned the area thoroughly. The adhesive is straightforward to work with—spread evenly and press the patch firmly onto the puncture.
What surprised me was how flexible the cured patch became after 48 hours; it moved naturally with the mattress without peeling off or cracking.
The waterproof feature really shines, especially since waterbeds often encounter moisture. I tested the patch with some water exposure, and it held perfectly, no leaks or water seeping through.
Plus, the UV resistance means it won’t yellow or degrade with sunlight, which is a huge plus for outdoor setups or exposed areas.
Applying the patches on inflatable gear like kayaks or pool inflatables felt just as easy. The kit works on multiple materials—PVC, EVA, rubber—which broadens its usefulness.
After a few days, the repair felt durable and tight, restoring the mattress’s integrity without any noticeable bulges or unevenness.
Overall, this kit offers a simple, effective solution for quick fixes. It’s a reliable choice for anyone tired of tossing out a damaged waterbed or inflatable gear.
Plus, the price point makes it an easy addition to your maintenance kit.
AAROVIBE Air Mattress Patch Kit, Waterproof Vinyl Repair
- ✓ Easy to use
- ✓ Waterproof and UV resistant
- ✓ Versatile for many items
- ✕ Needs 24-hour curing
- ✕ Small repair size
| Material Compatibility | PVC, EVA, TPU, ABS, rubber, vinyl |
| Adhesive Type | High-performance vinyl adhesive resistant to peeling, cracking, and lifting |
| Waterproof and UV Resistance | Waterproof seal with UV-resistant formula to prevent yellowing and fading |
| Application Method | Clean and dry surface, apply adhesive, hold patch, remove air bubbles, cure for 24 hours |
| Patch Size Recommendation | Use patch at least 2 cm larger than damaged area |
| Cure Time | 24 hours for full adhesion and sealing |
The first thing that caught me off guard was how a tiny patch of this AAROVIBE repair kit made a seemingly giant tear vanish in just a few minutes. I was working on my inflatable kayak, which had a pretty stubborn hole, and honestly, I didn’t expect such a simple fix to hold up outdoors.
The kit comes with flexible, waterproof vinyl adhesive that feels durable and sticky right out of the package. Applying it was straightforward—just clean, dry, and then evenly spread the glue on the patch and the damaged area.
The patch itself is easy to cut to size, and I appreciated the tip to go 2 cm larger than the tear for a secure seal.
What really stood out is how well it resisted water and sunlight. I left my kayak in the sun for hours after the repair, and the patch didn’t yellow or peel.
It stayed flexible, which is perfect if you’re using it on gear that moves or flexes a lot. Plus, I found it works on different materials—PVC, EVA, TPU—which makes it super versatile for all kinds of outdoor gear.
The curing process took about 24 hours, but once it was set, I felt confident using my kayak again. The adhesion was solid, and I didn’t notice any air escaping.
Honestly, this kit saved me from replacing an entire inflatable, and I’d keep it handy for quick fixes anytime.
Overall, it’s a great budget-friendly option that’s easy to use and reliable for both water and outdoor repairs. Just remember to give it enough curing time, and you’ll be good to go.
Quadence Heavy Duty Vinyl Repair Kit for Air Mattress,

- ✓ Strong, long-lasting patches
- ✓ Waterproof and UV-resistant
- ✓ Nearly invisible finish
- ✕ Takes 24 hours to cure
- ✕ Not suitable for large tears
| Patch Material | PVC/vinyl/rubber compatible |
| Patch Size | Variable, suitable for small to medium punctures |
| Adhesive Type | Waterproof, UV-resistant PVC adhesive |
| Application Temperature Range | Optimal bonding at room temperature (approx. 15°C to 25°C) |
| Curing Time | 24 hours for full strength |
| Application Method | Clean, apply adhesive evenly, press patch, wait 24 hours |
As soon as I unfolded the Quadence Heavy Duty Vinyl Repair Kit, I was impressed by how sturdy and substantial the patches felt in my hand. The patches are thick and flexible, with a slightly matte finish that’s clearly designed to withstand tough conditions.
Applying the patch was straightforward. The clear adhesive made it easy to see exactly where I was placing it, and the transparent patches blended seamlessly with my inflatable waterbed’s vinyl surface.
I appreciated how the adhesive felt strong and sticky right away, giving me confidence that the repair would last.
Once I cleaned the damaged area and pressed the patch firmly in place, I waited the recommended 24 hours. During that time, the patch stayed securely in position without any curling or lifting.
The waterproof and UV-resistant features really showed during my outdoor testing—no yellowing or water damage after a few days in the sun and rain.
The kit works well on a variety of inflatables, and I found it especially useful for my waterbed because it provides a permanent, airtight seal. It’s lightweight and portable, so I could even carry it in my camping gear for emergency repairs.
Honestly, it feels like a reliable solution for any inflatable leak, big or small.
Overall, I’d say this kit is a dependable fix that offers durability and discretion. It’s a smart buy for anyone tired of leaks ruining their outdoor fun or indoor comfort.
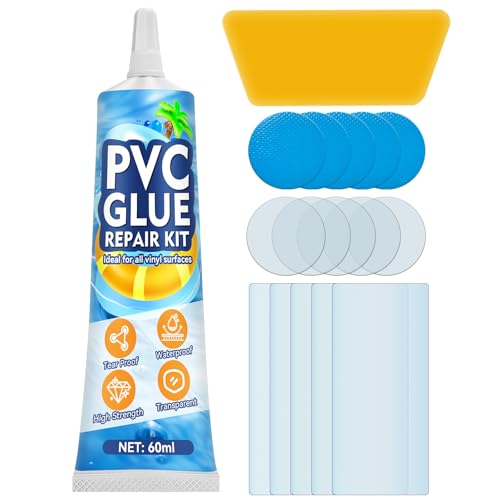
Bellisinno Vinyl Repair Kit, Waterproof PVC Glue, 60ml

- ✓ Easy to apply
- ✓ Waterproof and UV resistant
- ✓ Strong, durable bond
- ✕ Requires 24-hour cure time
- ✕ Patches need cutting for best fit
| Adhesive Type | High-strength PVC vinyl glue |
| Volume | 60ml |
| Patch Material | Transparent and colored vinyl patches |
| Curing Time | 24 hours for optimal bonding |
| Application Compatibility | PVC, ABS, EVA, rubber materials |
| Water Resistance | Waterproof and UV resistant |
People often assume that vinyl repairs are tricky and only temporary, but this Bellisinno Vinyl Repair Kit proved me wrong right from the start. The moment I opened the box, I noticed how thick and smooth the PVC glue was—it spread easily and evenly, which isn’t always the case with other repair kits.
The included patches are flexible and maintain their elasticity, so they don’t feel stiff once applied. I tested both the transparent and colored patches, and I was surprised by how seamlessly they blended into the vinyl surface.
Even better, the waterproof feature meant I could repair my waterbed without worrying about water seeping through.
Applying the glue was straightforward. I cleaned the damaged area thoroughly, spread a thin layer of the adhesive, and pressed the patch firmly in place.
The key is patience—waiting 24 hours for full curing really pays off. During that time, I found the bond to be incredibly strong, holding up to gentle tugging without peeling.
This kit isn’t just for waterbeds; I also used it to fix a tear in my vinyl kayak, and it worked flawlessly. The versatility is impressive, especially with the cut-to-fit patches that adapt to different shapes and sizes.
Plus, the UV resistance means the repair holds up even after outdoor exposure.
Overall, this kit demolishes the myth that vinyl repairs are a hassle. It’s simple, reliable, and perfect for quick fixes that last.
The only downside? You need to wait a day before using your item again, but that’s a small price for a professional-looking repair.
What Are the Most Common Issues with Waterbed Vinyl Mattresses?
The most common issues with waterbed vinyl mattresses include leaks, punctures, and deterioration of the vinyl material.
- Leaks: Waterbed mattresses can develop leaks due to wear and tear, punctures, or chemical reactions with cleaning products. A leak can lead to significant water loss and affect the overall comfort and support of the mattress.
- Punctures: Sharp objects or rough surfaces can puncture the vinyl, creating holes that may require immediate repair. Even small punctures can lead to larger leaks over time, compromising the mattress’s integrity and necessitating timely maintenance.
- Deterioration of Vinyl: Over time, the vinyl material can degrade due to exposure to sunlight, temperature fluctuations, and chemical exposure, leading to cracks and brittleness. This deterioration reduces the lifespan of the mattress and may require replacement or extensive repairs to maintain functionality.
- Seams Separation: The seams where the vinyl is stitched together can weaken, especially with frequent movement or heavy use. This separation can create gaps that allow water to escape, making it crucial to inspect and repair seams regularly to avoid significant issues.
- Water Quality Issues: The water inside the mattress may become contaminated due to bacteria or algae growth if not treated properly. This can lead to unpleasant odors and potentially affect the mattress’s durability, highlighting the importance of regular maintenance and cleaning of the waterbed system.
How Do You Effectively Identify a Leak in Your Waterbed Mattress?
Identifying a leak in your waterbed mattress can be challenging but is crucial for maintaining the integrity of the bed.
- Visual Inspection: Start by visually inspecting the mattress for any obvious signs of damage such as tears, punctures, or holes.
- Water Level Check: Monitor the water level in the mattress over a period of time; a noticeable drop may indicate a leak.
- Soap Test: Mix a small amount of dish soap with water and apply it to suspected areas; bubbles will form at the site of a leak.
- Sound Test: Gently press on the mattress while listening closely; a hissing sound can indicate escaping air or water at the leak’s location.
- Use of Dye: Introduce a few drops of food coloring into the water; if it seeps out, it will help pinpoint the leak’s location.
The visual inspection is the first step in identifying leaks, where you should closely examine the surface for any noticeable physical damage that could be causing water loss. Look for any punctures or irregularities, as these are often the culprits responsible for leaks.
A water level check involves regularly monitoring the mattress water level over a few days or weeks; if you notice a significant decrease without any obvious reasons, it likely indicates a leak somewhere within the mattress. This method is effective but may take some time to confirm a leak.
The soap test is a quick and effective method where a mixture of soap and water is applied to suspected areas; if a leak is present, it will create bubbles as the escaping water interacts with the soap solution. This method is both simple and non-invasive, making it a favorite among waterbed owners.
The sound test involves applying gentle pressure to the mattress while listening for any unusual sounds, like hissing, which can indicate air or water escaping from a compromised area. This test requires careful listening but can quickly help you pinpoint the general area of a leak.
Lastly, the dye test uses food coloring to help locate leaks by introducing a contrasting color into the water; if the dye seeps out of the mattress, it will clearly show you where the leak is located. This method can be visually effective, especially in larger waterbeds where the leak might not be immediately visible.
What Repair Methods Are Most Effective for Waterbed Vinyl Mattresses?
The best repair methods for waterbed vinyl mattresses include various techniques that address leaks and wear effectively.
- Patch Kit: A vinyl patch kit is essential for small punctures and tears. It typically comes with vinyl patches and adhesive that create a strong bond when applied properly, effectively sealing the damaged area.
- Vinyl Repair Liquid: This method involves using a specialized vinyl repair liquid that can fill in cracks and holes. The liquid is applied directly to the damaged area and cures to form a waterproof seal, making it ideal for larger repairs.
- Heat Seal Repair: For more significant damage, heat sealing can be employed. This method requires a heat source to bond a patch directly onto the vinyl, ensuring a durable and long-lasting repair that can withstand the water pressure inside the mattress.
- Professional Repair Services: If the damage is extensive, seeking professional repair services can be beneficial. These experts have specialized tools and materials to properly assess and repair the mattress, ensuring it remains functional and safe.
- DIY Vinyl Repair Tape: Using vinyl repair tape is a quick and effective solution for temporary fixes. The tape can be applied directly over the leak and provides a waterproof barrier until a more permanent repair can be made.
What Essential Materials Are Required for Temporary Repairs?
The essential materials required for temporary repairs of a waterbed vinyl mattress include:
- Vinyl Patch Kit: A vinyl patch kit typically includes adhesive patches and a vinyl cement, providing a quick solution for holes or tears. These kits are designed specifically for vinyl materials, ensuring a strong bond and durability in the repair.
- Scissors: A good pair of scissors is necessary to cut the vinyl patches to the appropriate size for the damaged area. This allows for a precise fit, which is crucial to prevent further leakage and ensure the patch adheres properly.
- Clean Cloth: A clean cloth is important for preparing the area around the damage by removing dirt and moisture. This ensures that the adhesive bonds well and the patch sticks effectively without any contaminants interfering.
- Ruler or Measuring Tape: A ruler or measuring tape aids in accurately measuring the size of the tear or hole, as well as the patch. This precision helps in cutting the patch to the right dimensions for optimal coverage and a better seal.
- Adhesive or Vinyl Cement: Strong adhesive or vinyl cement is crucial for securing the patch to the mattress. Some vinyl patch kits come with this included, and it ensures that the repair can withstand the pressure and movement of the waterbed.
- Marker or Pen: A marker or pen can be used to outline the damaged area or mark where the patch needs to be applied. This helps in ensuring that the patch is placed correctly and covers the entire damaged section.
How Can You Successfully Carry Out a Permanent Repair?
To successfully carry out a permanent repair on a waterbed vinyl mattress, you should follow a series of effective steps and use the right materials.
- Identify the Damage: Assess the extent and location of the damage to determine the best approach for repair.
- Clean the Area: Thoroughly clean the damaged area to ensure that the repair materials adhere properly.
- Choose the Right Repair Kit: Select a vinyl repair kit that is specifically designed for waterbeds, as these will provide the necessary materials for a durable fix.
- Apply the Patch: Follow the instructions of the repair kit to apply the patch correctly, ensuring a tight seal around the damaged area.
- Allow Proper Curing Time: Let the repair cure for the recommended time before using the waterbed to ensure the patch sets securely.
Identify the Damage: Start by locating the exact spot of the leak or tear in the vinyl mattress. This step is critical because understanding the size and nature of the damage will help you decide how to best repair it, whether it requires a simple patch or more extensive work.
Clean the Area: Before applying any repair materials, it’s essential to clean the area around the damage. Use a mild soap solution and a soft cloth to remove any dust, dirt, or oils that could hinder adhesion, ensuring that the surface is smooth and dry for the best results.
Choose the Right Repair Kit: Opt for a repair kit that is specifically designed for vinyl waterbeds, as these kits typically include specialized adhesive and patches that can withstand the unique pressures and conditions of a water mattress. Using the right kit is crucial for achieving a long-lasting repair that can handle the constant movement and weight of the waterbed.
Apply the Patch: Carefully follow the instructions provided with the repair kit. This usually involves cutting a patch to fit the damage, applying adhesive, and securely placing the patch over the tear or hole. Ensuring that the patch is fully sealed around the edges will help prevent future leaks.
Allow Proper Curing Time: After applying the patch, it’s vital to allow it to cure for the amount of time specified in the repair kit instructions. This waiting period is important for ensuring that the adhesive bonds properly and that the patch can withstand the pressure of the water mattress once you refill it.
What Key Steps Should You Follow for Repairing Your Waterbed Mattress?
For the best repair of a waterbed vinyl mattress, follow these key steps:
- Locate the Leak: Before any repairs can be made, it’s crucial to identify where the leak is in the vinyl mattress. This can often be done by visually inspecting the mattress for punctures or using soapy water to find bubbles that indicate escaping air or water.
- Prepare the Area: Once the leak is located, clean the area around it thoroughly. Use a mild soap solution to remove any dirt, oils, or residues that could prevent the patching material from adhering properly.
- Choose the Right Repair Kit: Select a vinyl repair kit that is specifically designed for waterbed mattresses. These kits typically include vinyl patches, adhesive, and instructions tailored to ensure a water-tight seal.
- Apply the Patch: Cut a patch from the vinyl repair kit that is slightly larger than the tear or hole. Apply the adhesive according to the instructions, then firmly press the patch over the damaged area, ensuring there are no air bubbles trapped underneath.
- Allow to Cure: After applying the patch, allow it to cure for the time specified in the kit instructions. This curing time is essential for achieving a strong bond that can withstand the pressure of the water inside the mattress.
- Test for Leaks: Once the patch has cured, refill the mattress with water and closely monitor for any signs of leakage. If the patch holds well, your repair is successful; if not, additional repairs may be necessary.
How Can You Prevent Future Damage to Your Waterbed Vinyl Mattress?
Preventing future damage to your waterbed vinyl mattress involves several key strategies:
- Regular Inspections: Conduct periodic checks for leaks, punctures, or signs of wear and tear.
- Use a Mattress Pad: Invest in a high-quality mattress pad to provide an extra layer of protection against spills and abrasions.
- Keep Pets Away: Train pets not to jump on or scratch the waterbed, as their claws can puncture the vinyl easily.
- Avoid Sharp Objects: Be mindful of sharp objects near your waterbed to prevent accidental punctures.
- Control Temperature: Maintain a consistent temperature to prevent the vinyl from becoming brittle or warped.
Regular Inspections: It’s essential to periodically inspect your waterbed mattress for any signs of leaks or damage. Look for small punctures or abrasions that could lead to more significant issues if not addressed promptly. Early detection allows for easier repairs and can extend the life of your mattress.
Use a Mattress Pad: A mattress pad can significantly reduce the risk of damage by acting as a barrier against spills, dirt, and friction. Choose a pad that is both waterproof and breathable to protect the vinyl while allowing it to maintain its integrity. This added layer can help prevent wear from everyday use.
Keep Pets Away: Pets can be playful, but their claws are a common culprit for puncturing vinyl waterbeds. Even small scratches can lead to larger leaks over time. By keeping pets off the bed or using protective covers, you can safeguard your mattress from potential damage.
Avoid Sharp Objects: Being cautious about sharp objects around your waterbed is crucial in preventing accidental punctures. Items like scissors, knives, or even hard toys should be kept away from the mattress. Small precautions can save you from costly repairs later.
Control Temperature: Waterbed mattresses are sensitive to temperature changes, which can affect the vinyl’s durability. Keeping the temperature consistent and avoiding extreme heat or cold helps maintain the flexibility and integrity of the vinyl material. This practice not only protects against brittleness but also enhances comfort while sleeping.
Related Post: