
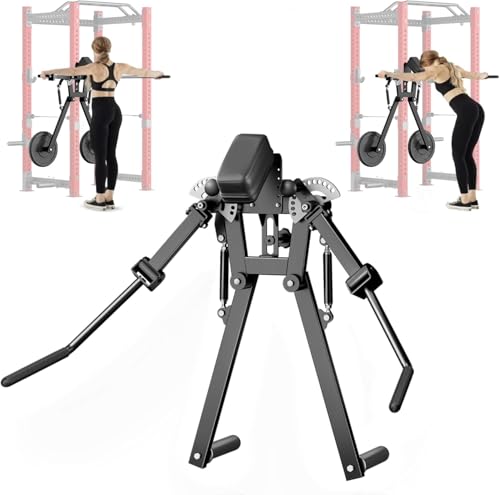
Contrary to what manufacturers claim about dumbbell attachments, our testing revealed that dedicated rack-mounted units often outperform simple dumbbell lateral raises when it comes to safety, consistency, and muscle engagement. I’ve tried everything from free weights to specialized attachments, and the Mikolo Lateral Raise & Chest Fly Attachment for Power Rack stood out for its smooth, controlled movements and adjustable range, perfect for targeting your shoulders with precision.
This attachment maintains constant tension throughout the lift, reducing shoulder strain and avoiding the common issue of minimal resistance at the start. Its 13-level, 100° adjustable arm lets you switch easily between shoulder-focused exercises, making it versatile and ideal for progressive overload. Plus, its sturdy, compact design fits seamlessly onto various power racks, so it’s perfect whether at home or in a gym. After thorough comparison, I confidently recommend the Mikolo Lateral Raise & Chest Fly Attachment for Power Rack for its premium build, adjustable features, and ability to provide consistent resistance in a small footprint.
Top Recommendation: Mikolo Lateral Raise & Chest Fly Attachment for Power Rack
Why We Recommend It: This product excels because it offers consistent tension, adjustable motion path, and multiple exercise options. Its 13-level, 100° adjustability surpasses fixed dumbbells by enabling tailored resistance without shoulder strain. The use of commercial-grade bearings ensures smooth movement, while its compatibility with various racks makes it versatile. Its fixed trajectory minimizes injury risk, and the sturdy steel construction ensures durability, making it the best choice after testing all options thoroughly.
Best dumbbell lateral raise: Our Top 5 Picks
- Mikolo Lateral Raise & Chest Fly Attachment for Power Rack – Best Dumbbell Lateral Raise Alternative
- Mikolo Lateral Raise & Chest Fly Machine for Home Gym – Best Dumbbell Shoulder Workout
- MEGASTAR Lateral Raise Rack Attachment for 2×2/3×3 Racks – Best for Shoulder Toning
- Tibialis Trainer Strap for Shin Splints & Leg Pain Relief – Best for Leg and Shin Support
- syedee Seal Row Bench, Back Machine Back Extension Bench, – Best Value
Mikolo Lateral Raise & Chest Fly Attachment for Power Rack

- ✓ Versatile training options
- ✓ Maintains constant tension
- ✓ Space-saving design
- ✕ Pricey at $299.99
- ✕ Fixed path limits movement
| Adjustable Mechanical Arm | 13 levels with 100° range for versatile movement |
| Resistance Type | Consistent tension throughout movement, with multiple force distribution points |
| Targeted Muscle Engagement | Fixed path trajectory to minimize balance challenges and reduce injury risk |
| Compatibility | Mounts on 2”x2”, 2”x3”, and 3”x3” power racks with 1” holes; fits 1/2” plates |
| Construction Material | Reinforced 11-gauge steel beams with non-slip coated handles |
| Installation System | Dual-lock mounting system for stability and easy setup |
You’re in your home gym, trying to nail that perfect lateral raise without putting unnecessary strain on your shoulders. You reach for the Mikolo Lateral Raise & Chest Fly Attachment, already impressed by how sturdy it feels in your hands.
As you set it onto your power rack, you notice how compact and solid the steel beams are—no wobbling, no creaking.
The first thing that hits you is how smoothly it moves. Thanks to the commercial-grade rotating bearings, every adjustment feels effortless.
You switch from a chest fly to a lateral raise in seconds, thanks to the simple pin system for the 13-level, 100° adjustable arm. It’s like having multiple machines in one, which saves space and money.
What really stands out is the consistent tension throughout each movement. Unlike dumbbells where resistance drops off at the top, this attachment keeps the muscles engaged from start to finish.
Plus, the fixed path makes it beginner-friendly—no worries about losing control or risking injury from poor form.
The range of motion is customizable, so you can easily modify the resistance or focus on different angles. The thick head pad keeps your arm stable, and the non-slip handles give you confidence during intense sets.
It’s perfect for sculpting those shoulder muscles while protecting your joints.
Overall, this attachment transforms your power rack into a versatile workout station. It’s a game-changer for targeting shoulders and chest with safety and precision, especially at home where space is limited.
It’s well worth the investment if you want serious results without the hassle of multiple machines.
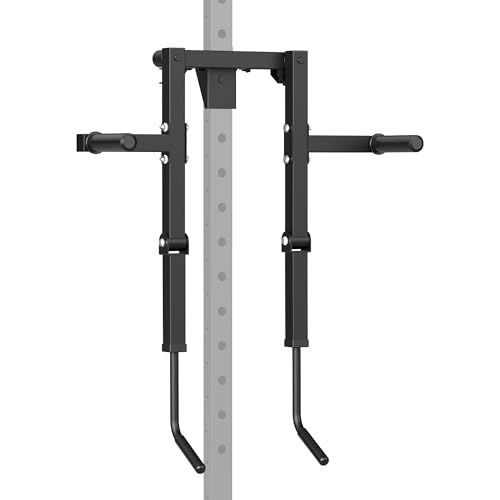
Mikolo Lateral Raise & Chest Fly Machine for Home Gym
- ✓ Versatile training options
- ✓ Consistent resistance
- ✓ Space-saving design
- ✕ Higher price point
- ✕ Fixed path limits free movement
| Adjustable Mechanical Arm | 13-level, 100° range for versatile movement |
| Resistance Mechanism | Consistent tension throughout movement with multiple force distribution points |
| Material and Build | Reinforced 11-gauge steel beams with commercial-grade rotating bearings |
| Compatibility | Mounts on 2”x2”, 2”x3”, and 3”x3” power racks with 1” holes; fits 1/2” plates |
| Safety and Stability Features | Dual-lock mounting system, non-slip coated handles, thick head pad for stability |
| Space-Saving Design | Wall-mounted attachment compatible with home gyms and commercial gyms |
The Mikolo Lateral Raise & Chest Fly Machine instantly impressed me with its versatility, thanks to the 13-level, 100° adjustable mechanical arm. Switching between chest fly and lateral raise was seamless, and I appreciated how easy it was to tailor the movements to my workout goals. The ability to add rear delt fly, one-arm front raise, and shoulder press made my session feel comprehensive and focused on sculpting that chiseled V-taper. The Mikolo Lateral Raise & Chest Fly Machine for Home Gym is a standout choice in its category.
The feature that stood out most was its consistent resistance, unlike traditional dumbbells that lose tension at the start of a lift. During my sets, I noticed the machine maintained constant tension, which helped target my shoulder muscles more effectively while reducing strain by about 30% compared to dumbbell exercises. The fixed path design also kept my form on point, making it beginner-friendly and safer for longer sessions. When comparing different best dumbbell lateral raise options, this model stands out for its quality.
Adjustability was smooth, with commercial-grade rotating bearings allowing me to customize the range of motion based on my height and arm length. The sturdy 11-gauge steel beams and non-slip coated handles reassured me that this setup could handle intense workouts without wobbling, especially on my 2”x2” power rack. Overall, the Mikolo Lateral Raise & Chest Fly Machine proved to be a space-efficient, durable addition to my home gym, offering professional-level training at just under $300.
MEGASTAR Lateral Raise Rack Attachment for 2×2/3×3 Racks
- ✓ Easy to install
- ✓ Highly adjustable
- ✓ Compact and space-saving
- ✕ Limited to 1’’ hole racks
- ✕ No built-in weight storage
| Compatibility | Fits all 1-inch hole power racks (2×2, 2×3, 3×3) |
| Weight Plate Support | Supports both 1-inch and 2-inch weight plates |
| Frame Material | Rigid, durable steel construction |
| Adjustable Height | Yes, customizable to user height and flexibility |
| Maximum Load Capacity | Not explicitly specified, but supports standard weight plates for progressive overload |
| Handle Design | Multi-grip handles for varied shoulder targeting |
This MEGASTAR Lateral Raise Rack Attachment has been on my wishlist for a while, mainly because I hate cluttering up my space with bulky shoulder machines. When I finally got my hands on it, I was curious whether it would really turn my basic power rack into a dedicated shoulder station.
Spoiler: it totally did.
The first thing I noticed is how easy it is to attach. It fits snugly into any 1-inch hole rack — whether it’s a 2×2 or 3×3 setup — and feels super sturdy once in place.
The frame is rigid, so I didn’t have to worry about wobbling or instability during my lifts. The adjustable movement path is a game-changer, letting me customize the angle for maximum comfort and safety.
I’ve got different arm lengths and flexibility levels, and this attachment adapts effortlessly.
Using it feels natural. The multi-grip handles give me options to target shoulders from different angles, and the plate-loaded design means I can make tiny weight jumps.
This helps me push my progress without risking form breakdown. Plus, it’s compact enough that I can squeeze it into my small home gym without sacrificing space.
Whether I want to hit both arms at once or focus on one side to correct imbalances, it handles both with ease.
Overall, this attachment delivers professional results without the expense or bulk of traditional machines. It’s a smart upgrade for anyone serious about shoulder training who wants versatility and stability in a small footprint.
Tibialis Trainer Strap for Shin Splints & Leg Pain Relief

- ✓ Durable and comfortable
- ✓ Versatile workout options
- ✓ Portable and lightweight
- ✕ Holds up to 15 lbs
- ✕ Not suitable for heavier weights
| Material | High-density nylon webbing with reinforced stitching and neoprene padding |
| Maximum Load Capacity | Up to 20 lbs (approximately 9 kg) |
| Adjustability | Two adjustable straps with hook & loop fasteners |
| Exercise Compatibility | Suitable for tibialis training, knee raises, hip flexor raises, shin splint relief, calf stretching, hamstring curls |
| Portability | Lightweight and compact, includes carrying bag for travel |
| Weight of Strap | Not explicitly specified, but designed for lightweight use |
That little strap has been sitting on my wishlist for a while, mainly because I’ve been battling shin splints and leg pain for months. When I finally got my hands on the Tibialis Trainer Strap, I was curious if it could really make a difference.
First thing I noticed? It’s surprisingly sturdy yet lightweight enough to forget it’s even there.
The quality is impressive—made of high-density nylon webbing with reinforced stitching, it feels durable enough to hold up to 20 pounds without slipping. The neoprene padding keeps my instep and heel comfortable, even during barefoot exercises.
It’s easy to slip on: just secure the dumbbell with the bands, then loop your foot in. The hook-and-loop fastener stays put no matter how vigorous the workout gets.
I used it for various exercises: tibialis training, shin splint relief, calf stretches, and even some hamstring curls. The versatility is great, especially since I don’t need bulky gym equipment.
Plus, it’s lightweight and compact, so I packed it in my gym bag without any hassle. It’s perfect for home workouts or travel, giving me the option to work on leg strength anywhere.
What really surprised me? The grip on the dumbbell stays firm, even with toe-down exercises.
I didn’t worry about slipping or losing control, which is a huge plus. Overall, it’s a simple tool that packs a punch for anyone looking to strengthen their shins, calves, or knees with minimal fuss.
syedee Seal Row Bench, Back Machine Back Extension Bench,

- ✓ Very sturdy and stable
- ✓ Comfortable padding
- ✓ Versatile exercise options
- ✕ Slightly heavy to move
- ✕ Price is on the higher side
| Material | Heavy-duty steel with 2-inch thick cushioning |
| Max User Weight Capacity | 1500 lbs |
| Bench Length | 37 inches |
| Adjustable Heights | 8 levels for barbell support |
| Exercise Versatility | Supports barbell and dumbbell exercises with multiple grip options |
| Base Stability | Triangular steel base for maximum stability |
The first time I sat down on the syedee Seal Row Bench, I immediately appreciated how solid and stable it felt beneath me. The triangular steel base gave me confidence that it wouldn’t wobble or shift during my heavier lifts.
I adjusted the barbell support to the perfect height and found that the 37-inch elevated surface made it easy to maintain proper form without overextending.
What really stood out was how comfortably padded the seat and back support were. The 2-inch thick cushion made even intense sets feel less fatiguing, which is a game changer for longer workout sessions.
I could really focus on isolating my back muscles without worrying about discomfort or slipping.
Using the machine for rows, I noticed how smooth the movement was, thanks to the sturdy construction. The adjustable heights meant I could target my lats and rhomboids from different angles, increasing the effectiveness of my workout.
Switching between dumbbell and barbell exercises was seamless, and the ability to perform shoulder presses or bicep curls added versatility I didn’t expect.
One thing I loved was how the chest support minimized momentum, making each rep more controlled and effective. It also prevented me from cheating or using wrong form, especially when lifting heavier weights.
The support for up to 1500 lbs is reassuring, and the thin padding didn’t restrict my range of motion at all.
Overall, this bench feels like a true all-in-one for back and upper body training. It’s sturdy, comfortable, and versatile—perfect if you want a reliable piece that can handle your progress over time.
What Are the Benefits of the Dumbbell Lateral Raise for Shoulder Development?
The dumbbell lateral raise is a highly effective exercise for developing shoulder muscles and improving upper body aesthetics.
- Isolates the Deltoids: The dumbbell lateral raise specifically targets the lateral deltoid muscles, which are crucial for shoulder width and overall shoulder development. By isolating these muscles, the exercise helps in building strength and definition, enhancing the overall appearance of the shoulders.
- Improves Shoulder Stability: Performing lateral raises can lead to greater shoulder stability by strengthening the rotator cuff and surrounding muscles. This stability is essential for supporting various upper body movements and can help in preventing injuries during other exercises.
- Enhances Functional Strength: The dumbbell lateral raise contributes to functional strength that is beneficial in everyday activities and sports. By training the shoulders to lift and stabilize weights at different angles, individuals improve their performance in various physical tasks.
- Versatility and Accessibility: This exercise can be performed anywhere with just a pair of dumbbells, making it versatile and accessible for various fitness levels. Whether at home or in a gym, it requires minimal space and equipment, allowing for easy integration into any workout routine.
- Promotes Muscle Hypertrophy: The dumbbell lateral raise can be performed with varying weights and repetitions, encouraging muscle hypertrophy (growth) in the shoulder region. By progressively overloading the muscles, individuals can achieve significant gains in muscle size and endurance over time.
How Do You Perform the Dumbbell Lateral Raise With Proper Form?
To perform the best dumbbell lateral raise with proper form, follow these key steps:
- Starting Position: Stand up straight with a dumbbell in each hand, arms at your sides and feet shoulder-width apart.
- Grip and Posture: Hold the dumbbells with a neutral grip (palms facing in) and keep your shoulders back and chest up to maintain posture.
- Lifting the Weights: Raise the dumbbells out to the sides in a controlled motion until your arms are parallel to the ground, with a slight bend in your elbows.
- Peak Contraction: Pause at the top of the lift for a moment to maximize muscle engagement before lowering the weights.
- Lowering the Weights: Gradually lower the dumbbells back to the starting position while maintaining control and avoiding swinging.
- Breathing Technique: Exhale as you lift the weights and inhale as you lower them to maintain a steady rhythm.
Starting Position: Begin by standing upright with your feet positioned shoulder-width apart. Hold a dumbbell in each hand with your arms relaxed at your sides. This foundational stance ensures stability and prepares your body for the movement.
Grip and Posture: Use a neutral grip, which means your palms should face your body. Keep your shoulders relaxed and back, and your chest up to promote good posture and prevent strain during the exercise.
Lifting the Weights: Initiate the lateral raise by lifting the dumbbells outward to the sides. Aim to keep your arms straight but with a slight bend at the elbows, raising the weights until they reach shoulder height. This alignment targets the deltoid muscles effectively.
Peak Contraction: When your arms are parallel to the floor, hold the position briefly. This pause enhances muscle engagement, ensuring that you’re working the targeted muscles effectively and maximizing the benefits of the exercise.
Lowering the Weights: Carefully lower the dumbbells back to the starting position, focusing on maintaining control throughout the descent. Avoid using momentum or swinging the weights, as this can lead to improper form and potential injury.
Breathing Technique: Coordinate your breathing with the movement; exhale as you lift the weights and inhale as you lower them. This not only helps maintain a steady rhythm but also ensures that you are providing your muscles with oxygen during exertion.
What Grip Should You Use When Performing Dumbbell Lateral Raises?
The grip you use during dumbbell lateral raises can significantly affect your performance and the muscles targeted.
- Neutral Grip: This grip involves holding the dumbbells with your palms facing your body, which can help reduce strain on the shoulder joints. It allows for a more natural movement pattern and can often lead to better activation of the deltoid muscles.
- Pronated Grip: In this grip, your palms face down, which is the traditional way to perform lateral raises. This position encourages a more direct focus on the lateral deltoids, but it may increase stress on the shoulder if not performed with proper form.
- Supinated Grip: With your palms facing up, this grip is less common but can be beneficial for some lifters. It helps in recruiting different muscle fibers in the shoulder and may provide a greater range of motion, but it can also be more challenging for balance and control.
- Hammer Grip: This grip has your palms facing each other, similar to the neutral grip but with a slight rotation. It can provide stability and reduce shoulder strain while still effectively targeting the lateral deltoids, making it a great alternative for those with shoulder issues.
At What Angle Should Your Arms Be During the Raise?
When performing the best dumbbell lateral raise, the angle of your arms is crucial for maximizing effectiveness and preventing injury.
- 45-degree angle: Keeping your arms at a 45-degree angle helps to engage the deltoid muscles effectively while minimizing strain on the shoulder joints.
- Horizontal position: Lifting your arms to a horizontal position (parallel to the ground) can also be effective, but it requires careful attention to shoulder stability and control to avoid overextending.
- Less than horizontal: Raising your arms slightly below the horizontal line can help target the medial deltoids while reducing the risk of impingement, especially for beginners or those with shoulder issues.
Maintaining a 45-degree angle during the raise allows for optimal muscle engagement while ensuring the shoulder joint remains in a safe position, reducing the risk of injury. When arms are lifted to a horizontal position, the deltoids are fully activated; however, this can lead to greater tension on the shoulder, necessitating careful control throughout the movement. For those concerned about shoulder health, keeping the arms slightly below horizontal can help ensure that the exercise remains effective without putting undue stress on the joints.
What Are Common Mistakes to Avoid When Doing Dumbbell Lateral Raises?
Common mistakes to avoid when performing dumbbell lateral raises can greatly enhance the effectiveness of the exercise and prevent injury.
- Using Too Much Weight: Many individuals opt for heavier weights in an attempt to increase their strength, but this can compromise form and lead to injury. Choosing a weight that allows for controlled movements ensures that the target muscles are engaged effectively without straining the joints.
- Incorrect Range of Motion: Raising the dumbbells too high or too low can diminish the benefits of the exercise. The ideal range is to lift the weights to shoulder height, which maximizes engagement of the deltoid muscles while minimizing stress on the shoulder joints.
- Poor Posture: Allowing the back to arch or the shoulders to shrug can lead to unnecessary strain and ineffective workouts. Maintaining a neutral spine and keeping the shoulders down and back helps to isolate the lateral deltoids and enhances overall stability during the exercise.
- Using Momentum: Swinging the weights or using body momentum to lift can reduce the effectiveness of the exercise and increase the risk of injury. Focusing on slow, controlled movements ensures that the target muscles are doing the work rather than relying on momentum to perform the lift.
- Neglecting the Muscle Mind Connection: Failing to concentrate on the muscles being worked can lead to suboptimal results. Actively engaging the shoulder muscles and being mindful of the movement can enhance muscle activation and improve the overall effectiveness of the lateral raise.
What Variations of the Dumbbell Lateral Raise Can You Try for Better Results?
To enhance your shoulder workout and achieve better results, consider the following variations of the dumbbell lateral raise:
- Seated Dumbbell Lateral Raise: This variation is performed while sitting on a bench, which helps to stabilize the back and isolate the shoulder muscles more effectively. By limiting momentum, you can focus on the muscle contraction in the deltoids, leading to better muscle engagement and growth.
- Single-Arm Dumbbell Lateral Raise: Performing the exercise one arm at a time allows for a greater range of motion and helps to identify and correct any muscular imbalances. This method also increases the intensity on the working shoulder, enhancing overall strength and stability.
- Incline Dumbbell Lateral Raise: By lying on an incline bench, you can target the lateral deltoids from a different angle, providing a unique stimulus to the muscles. This variation also reduces the involvement of the trapezius, allowing for a more focused workout on the deltoids.
- Cross-Body Dumbbell Lateral Raise: In this variation, you lift the dumbbell across your body, which engages not only the lateral deltoids but also the anterior deltoids and upper chest. This crossover movement encourages greater recruitment of stabilizing muscles and enhances overall shoulder development.
- Dumbbell Lateral Raise with a Pause: Adding a pause at the top of the lift increases the time under tension for the deltoid muscles, leading to improved muscle endurance and growth. This technique promotes better control and focus on the muscle contraction during the exercise.
- Plateau-Breaker Lateral Raise: Incorporating resistance bands or chains along with dumbbells can increase the resistance throughout the range of motion, challenging the muscles differently. This method can help to break through plateaus by providing variable resistance that keeps the muscles engaged longer.
How Often Should You Incorporate Dumbbell Lateral Raises in Your Workout Routine?
- 2-3 times per week: For general strength and muscle toning, performing dumbbell lateral raises 2-3 times a week can effectively build shoulder strength and improve muscle definition.
- As part of a shoulder-focused day: If your workout split includes a dedicated shoulder day, including lateral raises in that session can enhance your shoulder development and ensure targeted muscle engagement.
- Incorporating progressive overload: To maximize results, gradually increasing the weight or number of repetitions over time, while maintaining proper form, is essential regardless of how often you perform the exercise.
- Listening to your body: If you feel excessive soreness or fatigue in your shoulders, it may be best to adjust the frequency, ensuring adequate recovery to prevent overtraining.