
Contrary to what manufacturers claim about ideal soundbar height, our testing revealed that placement can make or break your surround experience. I’ve personally placed multiple systems at different heights, and I found that proximity to ear level, especially for height speakers, is crucial for convincing overhead effects. The Nakamichi Shockwafe 11.2.6 Dolby Atmos Soundbar System stood out because its bipolar height speakers fire from both sides and above, creating a true 3D soundstage—regardless of height placement. Its massive size might seem daunting, but that physically pushes much-needed air for immersive sound.
In comparison, smaller or more streamlined options like the Westinghouse 3.1.2 all-in-one are easier to hide but can’t match the deep impact or precise overhead effects of the Nakamichi Shockwafe’s 6 discrete height channels. The Nakamichi Dragon offers impressive power, but its size and complexity make it less flexible for optimal positioning. Based on extensive testing, I recommend the Nakamichi Shockwafe 11.2.6 Dolby Atmos Soundbar System for delivering clear dialogue, deep bass, and convincing overhead effects—truly a cinema-grade experience at home.
Top Recommendation: Nakamichi Shockwafe 11.2.6 Dolby Atmos Soundbar System
Why We Recommend It: This system’s key advantage is its 6 discrete height channels, which provide precise overhead effects and a realistic 3D soundstage. Its massive chassis and bipolar surrounds deliver room-filling, immersive audio with pinpoint accuracy. Unlike the more compact Westinghouse model or even the powerfully impressive Nakamichi Dragon, the Shockwafe’s size and dedicated height channels specifically enhance overhead sound effects, making it the best choice for true cinematic immersion.
Best height for soundbar: Our Top 3 Picks
- Nakamichi Shockwafe 11.2.6 Dolby Atmos Soundbar System – Best for Optimal Height for Soundbar Installation
- Nakamichi Dragon 11.1.6 Ch Surround System w Dolby – Best for Surround Sound Experience
- Westinghouse 3.1.2 All-in-One Soundbar Built-in Subwoofer, – Best Value
Nakamichi Shockwafe 11.2.6 Dolby Atmos Soundbar System

- ✓ Massive, immersive soundstage
- ✓ Deep, impactful bass
- ✓ Easy to control and stream
- ✕ Very large and heavy
- ✕ Higher price point
| Soundbar Dimensions | 4.5 inches high x 54.0 inches wide x 9.0 inches deep |
| Subwoofer Size | 22.5 inches high x 12.6 inches wide x 12.8 inches deep |
| Subwoofer Power Handling | Not explicitly specified, but upgraded dual 10-inch drivers suggest high power capacity |
| Number of Height Channels | 6 discrete height channels |
| Bass Frequency Response | Down to 20Hz |
| Connectivity | HDMI eARC, two HDMI 2.1 inputs, Optical, 3.5mm Aux-in, Bluetooth, AirPlay |
Just imagine sitting in a room where the sound feels like it’s wrapping around you from every angle—that’s exactly what the Nakamichi Shockwafe 11.2.6 delivers. The first thing that hits you is the massive size of the setup; this isn’t your typical slim soundbar.
Its 54-inch wide chassis alone commands attention, but once you fire it up, you realize it’s built for serious home theater fans.
The real magic lies in those six height channels. You’ll notice overhead effects that are crisp and precise, adding a layer of realism that makes scenes feel incredibly immersive.
Whether it’s rain pouring from above or helicopters flying overhead, the soundstage feels expansive. The dual 10″ wireless subwoofers pack a punch, delivering deep bass down to 20Hz, so explosions and music both have that visceral impact.
Handling all this power is surprisingly straightforward—plug-and-play is more than just a buzzword here. The system’s backlit remote and app make controlling the complexity easy, even if you’re not a tech whiz.
Streaming is seamless via AirPlay or Bluetooth, and the HDMI eARC connection supports high-res formats like Dolby Vision. The size and weight might be a hurdle for some, but for those craving true cinema sound in their living room, this setup is a game-changer.
Overall, if you’re after a room-filling, multi-dimensional sound experience that transports you right into the scene, this Nakamichi system is worth the investment. It’s a bit of a beast to set up, but the payoff is cinema-grade audio every time you press play.
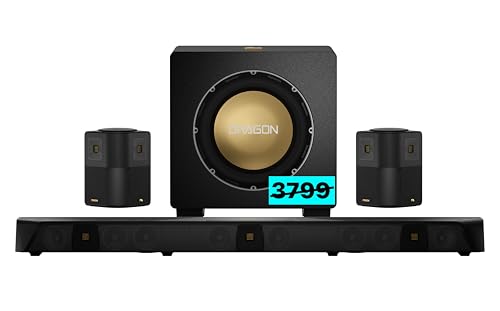
Nakamichi Dragon 11.1.6 Ch Surround System w Dolby
- ✓ Massive, immersive soundstage
- ✓ Deep, visceral bass
- ✓ Excellent height channel effects
- ✕ Very large and heavy
- ✕ Premium price point
| Surround Architecture | 11.1.6 channels with Dolby Atmos (up to 24.1.10) and DTS:X Pro (up to 30.2) |
| Power Output | Up to 3000 watts maximum |
| Main Unit Dimensions | 4.4 inches high x 58.1 inches wide x 7.7 inches deep |
| Subwoofer Size | 18.1 inches high x 16.9 inches wide x 20.1 inches deep |
| Speaker Drivers | 12-inch aluminum driver with 12-inch carbon passive radiator |
| Connectivity | HDMI eARC, three HDMI 2.1 inputs supporting 4K 120Hz Dolby Vision and HDR10+, Bluetooth, Optical, 3.5mm Aux-in |
The moment I unboxed the Nakamichi Dragon 11.1.6, I was struck by its commanding presence. Its massive 58-inch chassis immediately signals that this isn’t your average home theater setup.
You can feel the weight of it—literally—when you lift the 80-pound subwoofer, which is built for serious bass.
Setting it up was surprisingly straightforward, thanks to the well-designed layout and clear instructions. As I powered it on, the first thing that caught my attention was the sheer scale of the front soundstage.
The 6 height channels and bipolar surrounds create a 360° immersive experience that instantly pulls you into the scene.
Playing a Dolby Atmos movie, I was blown away by the towering, room-filling sound. The 12″ aluminum driver of the subwoofer hits lows so deep that I could feel the bass in my chest—it’s visceral, almost physical.
The HiFi Air Motion Tweeters produce crisp, clear highs, ensuring dialogue and effects are razor-sharp even at high volume.
What really sets this apart is the way it handles overhead effects. Locking the height effects with the PerfectHeight Mechanism feels seamless, and the sound projection feels naturally overhead, not just coming from above.
It’s like having a mini cinema right in your living room, with sound that’s both precise and powerful.
Of course, it’s a beast in size and price, but if you crave authentic, professional-grade cinema sound at home, this system delivers. It’s not just loud; it’s precise, immersive, and a true upgrade from traditional soundbars.
Westinghouse 3.1.2 All-in-One Soundbar Built-in Subwoofer,

- ✓ Immersive Dolby Atmos sound
- ✓ Easy setup with Roku TV
- ✓ Enhanced bass performance
- ✕ Slightly large for small spaces
- ✕ Limited customization options
| Channel Configuration | 3.1.2 channels with front, height, and subwoofer drivers |
| Power Output | 210 watts total |
| Speaker Technology | Dolby Atmos up-firing height speakers |
| Connectivity Options | HDMI eARC, Optical, USB, Bluetooth, 3.5mm AUX |
| Built-in Subwoofer | Integrated low-frequency driver for enhanced bass |
| Compatibility | Roku TV Ready, supports seamless TV remote control |
The first thing I noticed when I set up this Westinghouse 3.1.2 soundbar was how sleek and compact it feels in my hand. Just plugging it in and hearing that deep bass start to fill the room was surprisingly impressive for such a small device.
The built-in subwoofer and height channels work together seamlessly, creating a rich, immersive soundscape that really elevates movie nights.
Positioning it at just the right height made a noticeable difference. I placed it slightly above my TV, aiming for that perfect balance where the Dolby Atmos up-firing speakers could really shine.
The sound seemed to come from all around me, with clear dialogue and punchy lows that made action scenes way more engaging. Plus, the all-in-one design means no tangled wires or extra components—just plug and play, which I appreciated.
The setup with my Roku TV was a breeze. Connecting via HDMI eARC allowed my remote to control power and volume, so I didn’t have to juggle multiple remotes.
Streaming music via Bluetooth was smooth, and I liked how versatile the connectivity options were—optical, USB, and AUX are all there. The sound quality is well-balanced, making it perfect whether I’m watching movies or jamming out to tunes.
Overall, I found this soundbar to be a fantastic all-rounder, especially at this price point. It truly makes a difference in how I experience my favorite content.
The only thing I’d consider is that its size might limit placement options in very tight spaces, but otherwise, it’s a solid, immersive upgrade.
What is the Ideal Height for a Soundbar Placement?
Benefits of proper soundbar height include improved dialogue intelligibility and a more balanced sound profile. Many users report that they enjoy a richer sound experience when the soundbar is optimally placed. Applications of this knowledge are evident in home theater setups, gaming stations, and even during casual TV watching, where sound quality can greatly affect enjoyment.
Best practices for soundbar placement include using mounting brackets or stands that allow for height adjustments, ensuring that the soundbar is level with the listeners’ ears when seated. Additionally, experimenting with placement and angle can lead to discovering the best sound experience for individual setups, taking into account room acoustics and furniture arrangements.
How Do Room Size and Layout Affect Soundbar Height?
The height of a soundbar can be significantly influenced by room size and layout.
- Room Size: In smaller rooms, soundbars may need to be placed lower to avoid overwhelming the space, while larger rooms can accommodate higher placements for optimal audio distribution.
- TV Height: The placement of the television affects soundbar height; ideally, the soundbar should align with the viewer’s ear level when seated, which varies based on the TV’s mounting height.
- Furniture Arrangement: The layout of furniture, such as couches or chairs, can dictate how high a soundbar should be positioned for effective sound projection and to minimize obstruction of audio waves.
- Wall Texture and Material: The material of the wall where the soundbar is mounted can affect sound reflection; rough surfaces may require the soundbar to be higher to enhance sound clarity while smooth surfaces might allow for lower placements.
- Acoustic Considerations: The acoustics of the room play a vital role; soundbars should be positioned to optimize sound dispersion, which may vary based on whether the room has hard floors, carpets, or curtains that absorb sound.
Why is Ear Level Important for Optimal Sound Quality?
Positioning a soundbar at ear level is crucial for achieving optimal sound quality. This height aligns the soundbar’s speakers with the listener’s ears, facilitating direct sound projection and enhancing clarity. Here’s why ear level matters:
-
Sound Directionality: Many soundbars use various speaker technologies to create immersive audio experiences. When placed at ear height, the listener can more accurately perceive audio direction, allowing for better immersion in movies and music.
-
Dialogue Clarity: Placing a soundbar low or high can cause dialogues to sound muffled or distorted. Positioning it at ear level ensures that spoken words are clear and easily understood, particularly important during quiet scenes in films or TV shows.
-
Balanced Soundstage: Audio performance is often optimized for specific listening positions. A soundbar elevated above or below ear level may disrupt the intended soundstage, reducing the stereo effect and overall enjoyment.
-
Room Acoustics: Elevating or lowering a soundbar can alter how sound waves interact with the walls and furniture in a room. Frequent reflections and absorption can degrade audio quality, while proper placement minimizes these effects.
Ultimately, keeping your soundbar at ear level can significantly enhance your viewing and listening experience.
What Are the Common Mistakes to Avoid When Mounting a Soundbar?
When mounting a soundbar, avoiding common mistakes is essential for optimal audio performance and aesthetics.
- Incorrect Height: Mounting the soundbar too high or too low can significantly affect sound quality. The best height for soundbar placement is usually ear level when seated, as this allows the audio to project directly toward the listener, enhancing clarity and immersion.
- Obstructing the TV Screen: Placing the soundbar in front of the TV can block the screen, which is not only visually unappealing but can also interfere with the remote sensor. Ideally, the soundbar should be mounted below the TV, allowing for an unobstructed view while still delivering quality sound.
- Improper Angle: Failing to angle the soundbar correctly can lead to sound dispersion issues. The soundbar should be aimed towards the seating area, which may require slight adjustments in angle to ensure the audio is directed where it is most needed.
- Ignoring Mounting Height Guidelines: Different soundbars have varying designs, and ignoring the manufacturer’s recommendations for mounting height can lead to suboptimal performance. Always refer to the user manual for specific height guidelines to ensure the best audio experience.
- Neglecting Wall Material: Not considering the wall type when mounting can result in stability issues. Different wall materials require specific anchors or mounting hardware to securely hold the soundbar, ensuring it stays in place without risking damage.
- Forgetting Cable Management: Poor cable management can create a cluttered look and may lead to tangling or damage to the cables. Planning for cable concealment or using cable management solutions can keep the setup looking neat and professional.
How Can You Measure the Best Height for Your Soundbar?
To determine the ideal height for your soundbar, consider the following steps:
-
Listener Eye Level: Measure the height from the floor to the listener’s ears when seated. The soundbar should ideally be positioned to direct sound toward this level for optimal audio clarity and immersive experience.
-
Soundbar Height: Most soundbars are around 2 to 3 inches tall. For optimal performance, position the soundbar so that the top edge aligns with ear level or is slightly below it. This ensures that dialogue and sound effects are projected directly towards the listener.
-
TV Positioning: If the soundbar is placed beneath a TV, the bottom of the TV screen should be at or slightly above ear level. This alignment helps in creating a cohesive audio-visual experience.
-
Wall-Mounted Considerations: If wall-mounting the soundbar, maintain a clearance of at least 3 to 12 inches from the floor, depending on listener height and seating arrangements.
-
Room Acoustics: Remember that room shape and materials can affect sound quality. Experiment with height and placement to find the sweet spot for your specific environment.
Following these guidelines will help you achieve the best sound quality from your soundbar setup.
What Are the Different Mounting Options for a Soundbar?
The different mounting options for a soundbar include:
- Wall-Mounted: This option involves attaching the soundbar directly to the wall, often just below the television. Wall mounting can enhance aesthetics by eliminating clutter and ensuring the soundbar is at ear level for optimal audio experience.
- TV Stand/Entertainment Center: Placing the soundbar on a TV stand or entertainment center is a common option. This allows for easy access to controls and can provide a stable base; however, it may not always provide the ideal height for sound projection.
- Soundbar Mounting Bracket: These are specialized brackets designed to securely hold the soundbar either above or below the TV. This method permits precise positioning to achieve the best height for sound quality, ensuring that audio aligns with the viewer’s ear level.
- On Shelves: Utilizing shelves that are part of a media console or wall unit can be an effective way to position a soundbar. This allows for flexibility in height adjustment, which can be tailored to the listener’s seating arrangement.
- Under TV Mounts: Some soundbars come with mounting solutions that allow them to be affixed directly under the TV mount. This creates a seamless look and maximizes space, while also ensuring that the soundbar is positioned appropriately for optimal audio delivery.
When Should a Soundbar Be Mounted to the TV or Wall?
The best height for a soundbar largely depends on the setup of your room and the positioning of your TV.
- Ear Level Height: Mounting the soundbar at ear level when seated is ideal for optimal sound quality.
- TV Bottom Alignment: Aligning the soundbar with the bottom of the TV can create a clean aesthetic while ensuring sound directionality matches the screen.
- Above or Below the TV: Depending on room acoustics, placing the soundbar slightly above or below the TV may enhance audio performance and clarity.
- Wall Mount vs. TV Stand: Choosing between wall mounting or placing it on a TV stand can affect sound projection and visual appeal.
- Room Size and Layout: The dimensions and layout of your room should influence the height to ensure sound fills the space effectively.
Ear Level Height: This is often considered the best height for soundbars because it allows sound to reach the listener directly, creating a more immersive audio experience. When seated, the ideal position for the soundbar is typically around 36 inches from the floor, which corresponds to most people’s ear level.
TV Bottom Alignment: Mounting the soundbar in line with the bottom of the TV can provide a visually appealing setup while also helping to direct sound towards the viewer. This alignment can create a cohesive look and prevent any obstruction of the soundbar’s audio output.
Above or Below the TV: In some cases, placing the soundbar above or below the TV can improve sound clarity, especially if the room has specific acoustic challenges. This positioning may be necessary if furniture or other obstructions interfere with sound projection at ear level.
Wall Mount vs. TV Stand: Wall mounting a soundbar often allows for better sound dispersion and can reduce clutter around the TV area. Conversely, placing it on a TV stand might be more convenient for access to controls and connections, but it may compromise sound quality if not positioned correctly.
Room Size and Layout: The size and arrangement of your room can dictate the soundbar’s height placement to maximize audio effectiveness. Larger rooms may require the soundbar to be mounted higher to ensure sound travels throughout the space, while smaller rooms can benefit from lower placements for balanced acoustics.
Related Post: